dewyser.net

solutions, scripting and more

Removing old agents in VMware Horizon VDI golden image — 5th Jan 2024

Removing old agents in VMware Horizon VDI golden image

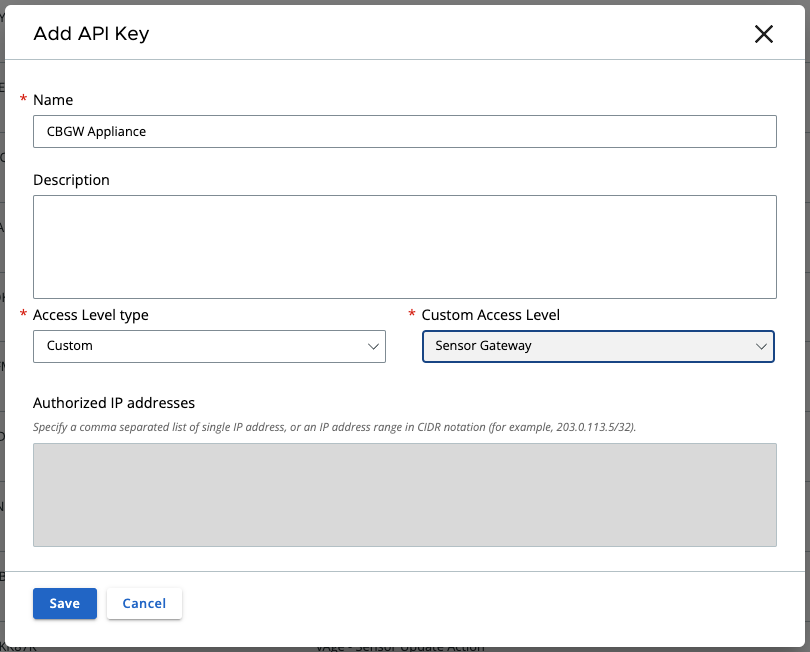
The following script finds the uninstall strings in the registry and removes old agents from the golden image.

$execpolicy = Get-ExecutionPolicy

Set-ExecutionPolicy Unrestricted

$installed = Get-ItemProperty 'HKLM:\Software\Microsoft\Windows\CurrentVersion\Uninstall\*' | Where-Object {$_.UninstallString -match "MsiExec.exe"} | Select-Object DisplayName, DisplayVersion, UninstallString
$installed += Get-ItemProperty 'HKLM:\Software\Wow6432Node\Microsoft\Windows\CurrentVersion\Uninstall\*' | Where-Object {$_.UninstallString -match "MsiExec.exe"} | Select-Object DisplayName, DisplayVersion, UninstallString

$apps = @("VMware Tools","VMware Horizon Agent","VMware Horizon Agent Direct-Connection Plugin","VMware Dynamic Environment Manager Enterprise","App Volumes Agent","Microsoft FSLogix Apps")

$uninstall = $installed | Where-Object {($_.DisplayName -in $apps)}

$uninstall

foreach ($app in $uninstall) {
    $uninstcmd = $app.UninstallString

    $uninstcmd = (($uninstcmd -split " ")[1] -replace "/I","/X") + " /qn REBOOT=ReallySuppress"
    $uninstprc = Start-Process msiexec.exe -ArgumentList $uninstcmd -NoNewWindow -PassThru -Wait
}

$check = Get-ItemProperty 'HKLM:\Software\Microsoft\Windows\CurrentVersion\Uninstall\*' | Where-Object {$_.UninstallString -match "MsiExec.exe"} | Select-Object DisplayName, DisplayVersion, UninstallString
$check += Get-ItemProperty 'HKLM:\Software\Wow6432Node\Microsoft\Windows\CurrentVersion\Uninstall\*' | Where-Object {$_.UninstallString -match "MsiExec.exe"} | Select-Object DisplayName, DisplayVersion, UninstallString

$check | Where-Object {($_.DisplayName -in $apps)} | Format-Table

Set-ExecutionPolicy $execpolicy
Installing new Microsoft Teams in VMware Horizon VDI — 4th Jan 2024

Installing new Microsoft Teams in VMware Horizon VDI

The following script installs the new teams in the vdi golden image. If an old version is installed it removes it first. Afterwards a registry key is set to disable automatic updates.

The correct files can be downloaded here.

# get the current execution policy
$execpolicy = Get-ExecutionPolicy

Set-ExecutionPolicy Unrestricted

# location to the teams bootstrapper file
$bootstrapperpath = $PSScriptRoot + '\teamsbootstrapper.exe'

# allow execution of the teams bootstrapper file
Unblock-File -Path $bootstrapperpath

# check if teams is currently installed
$teamsversion = Get-AppxPackage -Name *MSTEAMS*

if ($teamsversion) {
    # if installed remove teams
    Write-Host 'Uninstalling Microsoft Teams version ' $teamsversion.version -ForegroundColor Red

    Start-Process -FilePath $bootstrapperpath -ArgumentList '-x' -Wait
    $teamsversion = ""
}

# location to the teams msix file
$msixpath = $PSScriptRoot + '\MSTeams-x64.msix'

# configure installation parameters
$args = '-p -o "' + $msixpath + '"'

# install teams
Start-Process -FilePath $bootstrapperpath -ArgumentList $args -Wait

# registry path
$registrypath = 'HKLM:\SOFTWARE\Microsoft\Teams'

# disable teams autoupdate 
if (!(Test-Path $registryPath)) {
    New-Item -Path $registrypath -Force | Out-Null
    New-ItemProperty $registrypath -Name 'disableAutoUpdate' -Value 1 -PropertyType DWord -Force | Out-Null
} else {
    if (!(Get-ItemProperty $registrypath -Name 'disableAutoUpdate')) {
        New-ItemProperty $registrypath -Name 'disableAutoUpdate' -Value 1 -PropertyType DWord -Force | Out-Null
    } else {
        Set-ItemProperty $registrypath -Name 'disableAutoUpdate' -Value 1 -PropertyType DWord -Force | Out-Null
    }
}

# check if teams installed correctly
$teamsversion = Get-AppxPackage -Name *MSTEAMS*

if ($teamsversion) {
    Write-Host 'Installed Microsoft Teams version ' $teamsversion.version -ForegroundColor Green
}

# set execution policy back to original value
Set-ExecutionPolicy $execpolicy
Setting up Carbon Black sensor gateway appliance — 29th Nov 2023

Setting up Carbon Black sensor gateway appliance

First thing is to do a little preparation. In Carbon Black Cloud console you’ll need to set up an API key so the appliance can communicate with the cloud console.

Go to Settings > API Access and select “Add API Key”. Set the access level to custom and select Sensor Gateway from the custom access level drop down list:

Save the information as we’ll need it later.

Next is to generate a certificate that will be used on the appliance. You can skip this part if you use self-signed certificates instead but if you go with certificates you’ll the certificate in pem format with private key file and also the full chain, so including the appliance certificate.

Now we can deploy and configure the virtual appliance. For the CBC URL you can find the necessary information here: https://developer.carbonblack.com/reference/carbon-black-cloud/authentication/#hostname. The API ID and secret you saved before.

The entry point is the FQDN (preceded by https://) of the appliance (this information must match the certificate common name or san). The certificate line accepts more then just one line of data. You can put in the data from the pem certificate file. Same for the private.

Remember in the certificate chain put the full chain, so the certificate again and then intermediate (if used) and the root certificate. Passphrase is used if the certificate is encrypted with a password.

Last thing before deployment is the network information part.

After you boot the appliance you will see that it registers itself in the Carbon Black Cloud console under Settings > API Access > Sensor Gateways.

Now for the installation part of the sensors. You’ll see that you now have an option to generate a registration key through a Sensor Gateway. All devices installed with this new key will connect threw the Sensor Gateway Appliance instead of registering directly to Carbon Black Cloud console.

Carbon Black Workload not picking up new virtual machines in vCenter — 17th Nov 2023

Carbon Black Workload not picking up new virtual machines in vCenter

We recently came across a Carbon Black Workload appliance not picking up the new vCenter virtual machines. The plugin seemed to be working fine in vCenter but the inventory did not show any of the new machines.

Going to the appliance web interface and trying to log in revealed the password had expired.

Going in the vm console from vCenter, the appliance instantly asked to change the password, we did not have to use the following procedure. After the change we could log in to the web interface once again where the Carbon Black Plugin showed red for a few seconds and then turned green again:

After 10 to 15 minutes the virtual machines came visible in the plugin. We ended up disabling the admin password expiry to prevent this from happening again.

Enable Azure AD for vCenter Server —

Enable Azure AD for vCenter Server

This guide is based on VMware Docs and kb artitcle 94182

To connect vCenter to Azure AD (Entra ID) we need to create an OpenID Connect Application using the new app integration wizard:

In Azure AD go to App registrations and select new registration. Fill in the name and select Web for the redirect URI but leave it blank for now.

Go to Certificates & secrets and select New client secret

Copy and save the Value of the newly created client secret. Next enable the following mobile and desktop flows (App collects plaintext password):

Go to the overview tab of the application, copy and save the Application ID.

On the same tab click then Endpoints link and there copy OpenID Connect metadata document link.

Now in vCenter go Administration > Single Sign On > Configuration > Identity Provider and change the provider. Select Azure AD and RUN PRECHECKS.

Name the new directory and configure the domains

Fill in the saved values (App ID, secret value and OpenID link). Before continuing copy the Redirect URI.

Click on the Generate button to generate a secret token. You will need this on the enterprise application later.

Go back to the Azure app registration and under Authentication select Add a platform. Save the redirect URI from the previous step

Now in Azure AD go to Enterprise applications and create a new application, in the gallery search for VMware Identity Service and create the application.

On the application window go to Provisioning, then manage provisioning. Fill in vCenter Server URL (publicly accessible vCenter Server URL) and the secret token generated in vCenter before.

Go back to the Enterprise application > Users and Groups > Add User/group and select the user(s) and group(s) that you want to provision.

Back in vCenter you must configure group membership before Azure AD users can log in to vCenter Server. Select the Administrator group and edit the members

Select the domain and look for the user(s)/group(s) you want to add by typing the first few characters of the Azure AD object.