dewyser.net

solutions, scripting and more

Enable Azure AD for vCenter Server — 17th Nov 2023

Enable Azure AD for vCenter Server

This guide is based on VMware Docs and kb artitcle 94182

To connect vCenter to Azure AD (Entra ID) we need to create an OpenID Connect Application using the new app integration wizard:

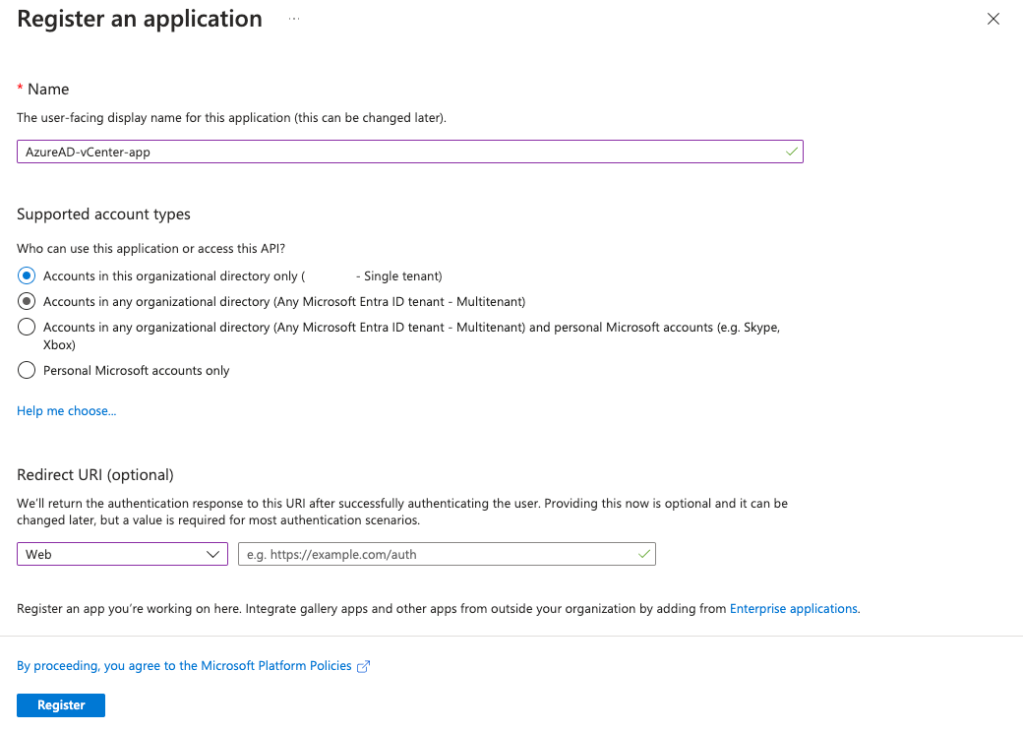
In Azure AD go to App registrations and select new registration. Fill in the name and select Web for the redirect URI but leave it blank for now.

Go to Certificates & secrets and select New client secret

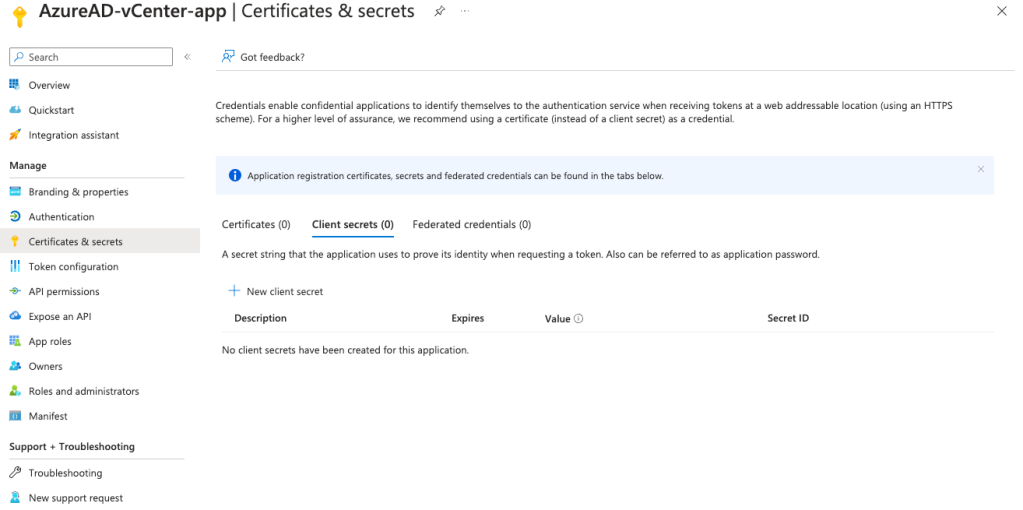
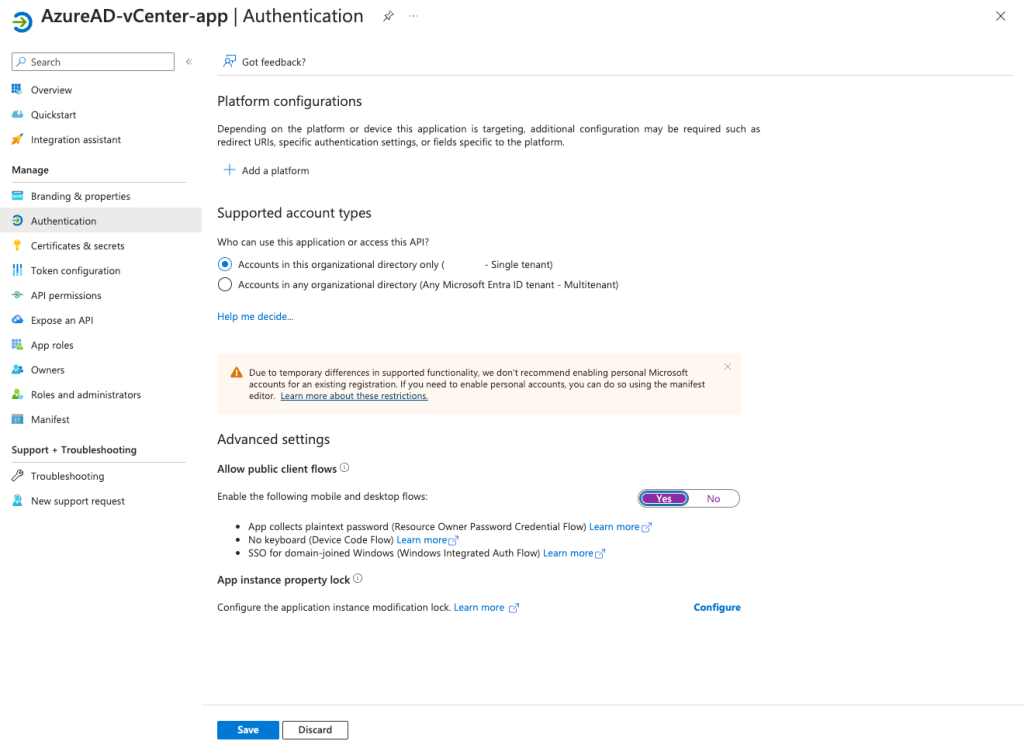
Copy and save the Value of the newly created client secret. Next enable the following mobile and desktop flows (App collects plaintext password):

Go to the overview tab of the application, copy and save the Application ID.

On the same tab click then Endpoints link and there copy OpenID Connect metadata document link.

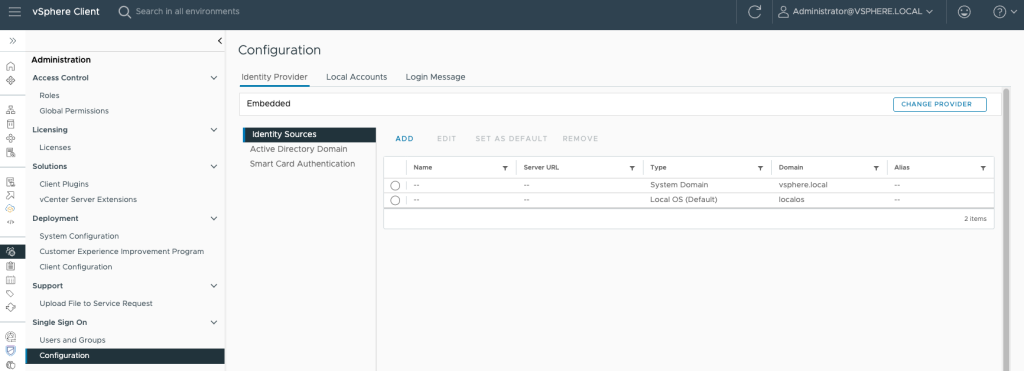
Now in vCenter go Administration > Single Sign On > Configuration > Identity Provider and change the provider. Select Azure AD and RUN PRECHECKS.

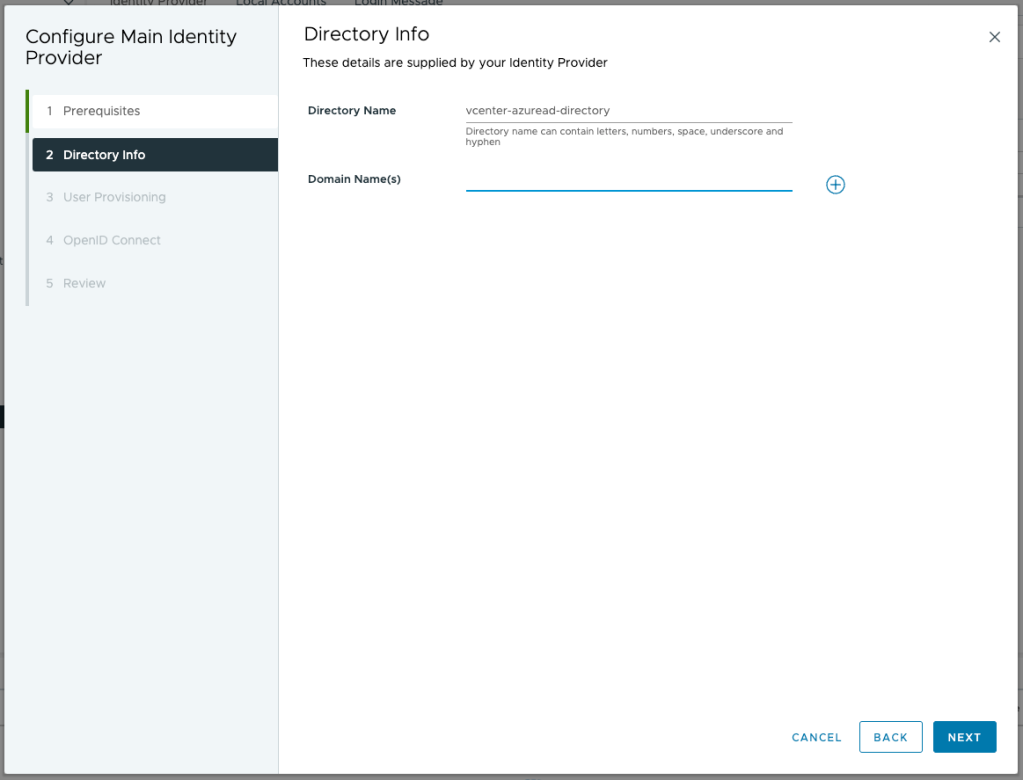
Name the new directory and configure the domains

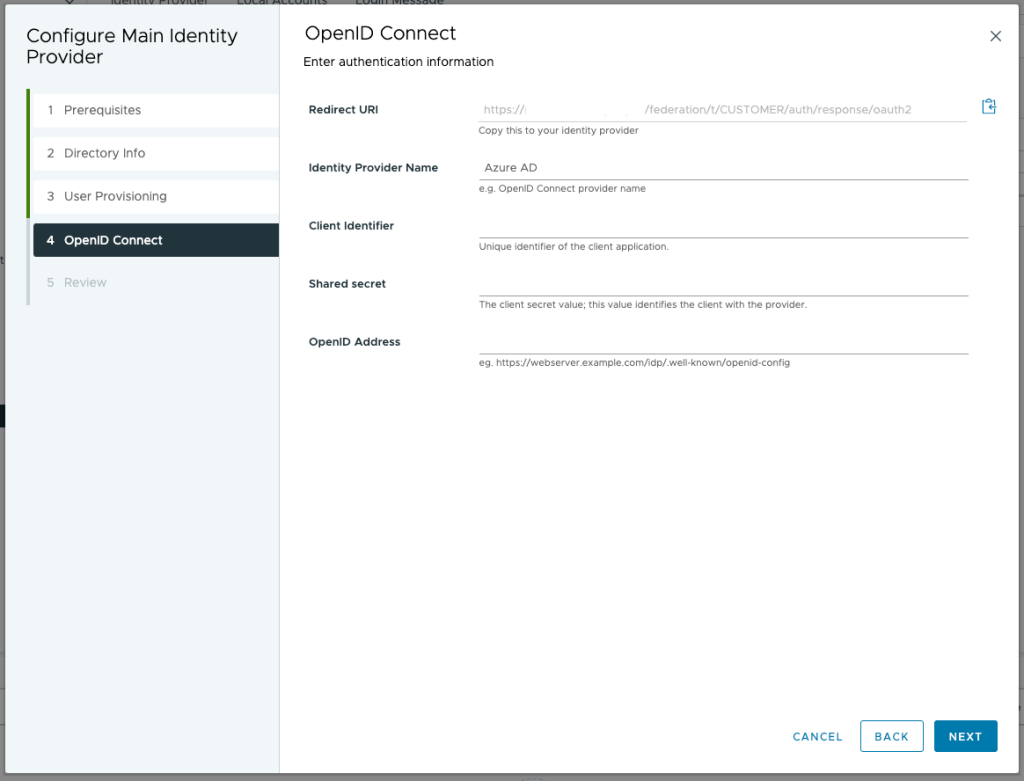
Fill in the saved values (App ID, secret value and OpenID link). Before continuing copy the Redirect URI.

Click on the Generate button to generate a secret token. You will need this on the enterprise application later.

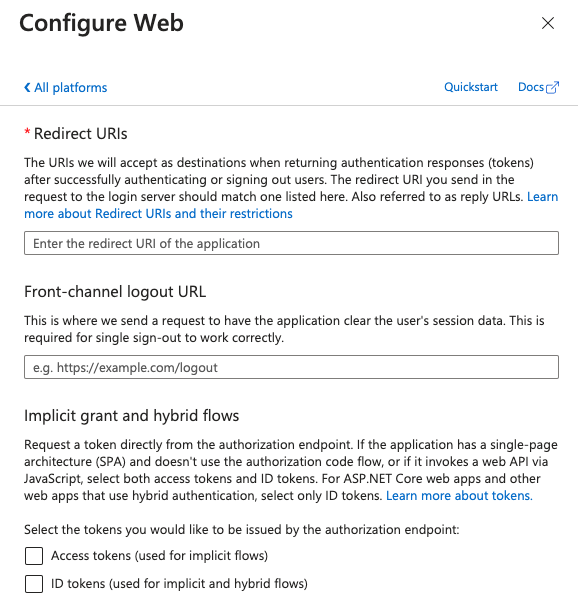
Go back to the Azure app registration and under Authentication select Add a platform. Save the redirect URI from the previous step

Now in Azure AD go to Enterprise applications and create a new application, in the gallery search for VMware Identity Service and create the application.

On the application window go to Provisioning, then manage provisioning. Fill in vCenter Server URL (publicly accessible vCenter Server URL) and the secret token generated in vCenter before.

Go back to the Enterprise application > Users and Groups > Add User/group and select the user(s) and group(s) that you want to provision.

Back in vCenter you must configure group membership before Azure AD users can log in to vCenter Server. Select the Administrator group and edit the members

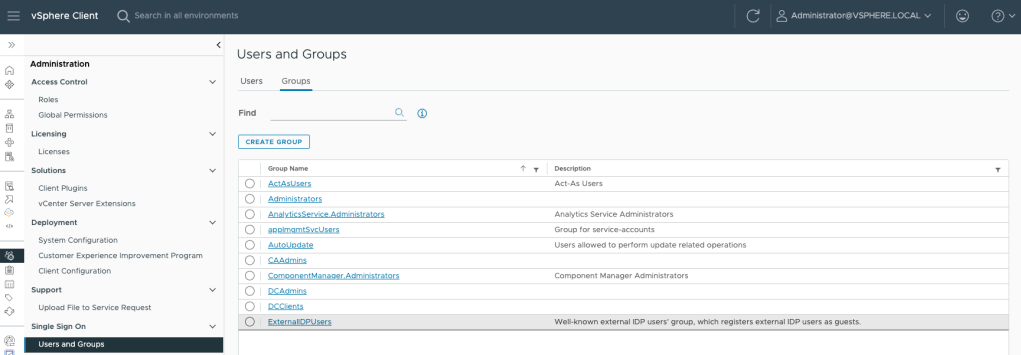
Select the domain and look for the user(s)/group(s) you want to add by typing the first few characters of the Azure AD object.

Setting up the Carbon Black Workload Appliance — 14th Nov 2023

Setting up the Carbon Black Workload Appliance

First thing is to download the OVA. Head over to VMware customer connect and download the Carbon Black Cloud Workload Protection Appliance OVA.

While downloading, in Carbon Black Cloud console under Settings > API Access > Access Levels create a custom API access level with the following permissions:

CategoryPermission NameNotation NameCREATEREADUPDATEDELETEEXECUTE
AppliancesSend workload assets to CBCinventory.collector.vcenterYes
AppliancesAppliances Registration
appliances.registration
YesYesYesYes
DeviceSensor kitsorg.kitsYes
DeviceQuarantinedevice.quarantineYes
DeviceGeneral informationdeviceYes
Live QueryManage querieslivequery.manageYesYesYesYes
VulnerabilityVulnerability Assessment DatavulnerabilityAssessment.dataYesYes
Workload ManagementView Workloads without sensorsworkloads.vcenter.vmYes
Workload ManagementInstall sensor on vCenter workloadworkloads.vcenter.vm_sensor_installYes

Next thing in Carbon Black Cloud console under Settings > API Access > API Keys is to create an API key using the above access level. Save the information together with the ORG KEY that you find on the same page.

Hopefully by now the download has finished. Head over vcenter and deploy the OVA and supply passwords for both root and admin account. Depending on your network infrastructure fill in the network information or leave blank for DHCP.

After deployment power on the appliance, fill in credentials and log in to the appliance.

The appliance is online but it still lacks communication with VMware vCenter and Carbon Black Cloud. Head to Appliance > Registration and provide the information for vcenter and the API information for connection to Carbon Black Cloud console.

If you done everything correctly it should all be green in the dashboard.

However, if like me, you messed up the ip configuration go to the vm console, change the ip information using the bellow command and reboot the appliance.

/opt/vmware/share/vami/vami_set_network eth0 STATICV4 <ip> <mask> <gateway>

Certificates (in the home lab) made easy – renewing esxi certificates — 25th Aug 2023

Certificates (in the home lab) made easy – renewing esxi certificates

You could do this manually using vCenter GUI:

Select a Host and go to Configure > Certificate. There you have the option to first refresh and then renew the certificate. Now that your vCenter is an issuing certificate authority with our custom certificates it would issue certificate with the template we configured 2 steps back.

Another option, and certainly the preferred one if you have several hosts is to do this with PowerCLI:

$CertificateManager = Get-View -id (Get-View ServiceInstance).Content.CertificateManager

Get-VMHost | ForEach-Object -Process {$CertificateManager.CertMgrRefreshCACertificatesAndCRLs($_.id)}

Get-VMHost | ForEach-Object -Process {$CertificateManager.CertMgrRefreshCertificates($_.id)}

Now you’ll see that if you visit the esxi servers, they also have a valid certificate.

Certificates (in the home lab) made easy – running vCenter Certificate Manager — 24th Aug 2023

Certificates (in the home lab) made easy – running vCenter Certificate Manager

Next is running vCenter Certificate Manager to replace the certificates. Log into vCenter Appliance using ssh and run the following command and select option 2 to replace VMCA root certificate with custom signing certificate and replace all certificates.

/usr/lib/vmware-vmca/bin/certificate-manager

Select Yes to generate all certificates using configuration file. Supply credentials and input values:

Use option 2 to import custom certificate(s) and key(s). Provide the file location of the two files:

Continue the operation using the option Y and wait for completion:

Certificates (in the home lab) made easy – vCenter preparation —

Certificates (in the home lab) made easy – vCenter preparation

Next we will set some advance parameters in our vCenter appliance using PowerCli. Below are the parameters that need to be changed:

  • vpxd.certmgmt.certs.cn.country
  • vpxd.certmgmt.certs.cn.email
  • vpxd.certmgmt.certs.cn.localityName
  • vpxd.certmgmt.certs.cn.organizationalUnitName
  • vpxd.certmgmt.certs.cn.organizationName
  • vpxd.certmgmt.certs.cn.state
  • vpxd.certmgmt.certs.daysValid
  • vpxd.certmgmt.certs.minutesBefore

If the vCenter appliance currently has a untrusted certificate we need to change the certificate action so that we can connect to the vCenter.

Set-PowerCLIConfiguration -InvalidCertificateAction:Ignore -Confirm:$false

Next we can connection to the vCenter using the following PowerCLI command:

connect-VIServer vc-01.dewyser.lab

You will receive output name, port and username if the connection is successful.

With the following command you can retrieve the current values for the parameters specified above:

Get-AdvancedSetting -Entity vc-01.dewyser.lab -Name vpxd.certmgmt.certs.*

Next set the parameters to the correct values:

Get-AdvancedSetting -Entity vc-01.dewyser.lab -Name vpxd.certmgmt.certs.cn.country | Set-AdvancedSetting -Value 'BE' -Confirm:$false
Get-AdvancedSetting -Entity vc-01.dewyser.lab -Name vpxd.certmgmt.certs.cn.email | Set-AdvancedSetting -Value 'info@dewyser.lab' -Confirm:$false
Get-AdvancedSetting -Entity vc-01.dewyser.lab -Name vpxd.certmgmt.certs.cn.localityName | Set-AdvancedSetting -Value 'Diksmuide' -Confirm:$false
Get-AdvancedSetting -Entity vc-01.dewyser.lab -Name vpxd.certmgmt.certs.cn.organizationalUnitName | Set-AdvancedSetting -Value 'IT Infrastructure' -Confirm:$false
Get-AdvancedSetting -Entity vc-01.dewyser.lab -Name vpxd.certmgmt.certs.cn.organizationName | Set-AdvancedSetting -Value 'dewyser.lab' -Confirm:$false
Get-AdvancedSetting -Entity vc-01.dewyser.lab -Name vpxd.certmgmt.certs.cn.state | Set-AdvancedSetting -Value 'West-Vlaanderen' -Confirm:$false
Get-AdvancedSetting -Entity vc-01.dewyser.lab -Name vpxd.certmgmt.certs.daysValid | Set-AdvancedSetting -Value '397' -Confirm:$false
Get-AdvancedSetting -Entity vc-01.dewyser.lab -Name vpxd.certmgmt.certs.minutesBefore | Set-AdvancedSetting -Value '5' -Confirm:$false

Check the values again using the asterisk command to check if the changes are applied. The output should look like this:

If the values are set we are ready for the next part.