dewyser.net

solutions, scripting and more

Removing old agents in VMware Horizon VDI golden image — 5th Jan 2024

Removing old agents in VMware Horizon VDI golden image

The following script finds the uninstall strings in the registry and removes old agents from the golden image.

$execpolicy = Get-ExecutionPolicy

Set-ExecutionPolicy Unrestricted

$installed = Get-ItemProperty 'HKLM:\Software\Microsoft\Windows\CurrentVersion\Uninstall\*' | Where-Object {$_.UninstallString -match "MsiExec.exe"} | Select-Object DisplayName, DisplayVersion, UninstallString
$installed += Get-ItemProperty 'HKLM:\Software\Wow6432Node\Microsoft\Windows\CurrentVersion\Uninstall\*' | Where-Object {$_.UninstallString -match "MsiExec.exe"} | Select-Object DisplayName, DisplayVersion, UninstallString

$apps = @("VMware Tools","VMware Horizon Agent","VMware Horizon Agent Direct-Connection Plugin","VMware Dynamic Environment Manager Enterprise","App Volumes Agent","Microsoft FSLogix Apps")

$uninstall = $installed | Where-Object {($_.DisplayName -in $apps)}

$uninstall

foreach ($app in $uninstall) {
    $uninstcmd = $app.UninstallString

    $uninstcmd = (($uninstcmd -split " ")[1] -replace "/I","/X") + " /qn REBOOT=ReallySuppress"
    $uninstprc = Start-Process msiexec.exe -ArgumentList $uninstcmd -NoNewWindow -PassThru -Wait
}

$check = Get-ItemProperty 'HKLM:\Software\Microsoft\Windows\CurrentVersion\Uninstall\*' | Where-Object {$_.UninstallString -match "MsiExec.exe"} | Select-Object DisplayName, DisplayVersion, UninstallString
$check += Get-ItemProperty 'HKLM:\Software\Wow6432Node\Microsoft\Windows\CurrentVersion\Uninstall\*' | Where-Object {$_.UninstallString -match "MsiExec.exe"} | Select-Object DisplayName, DisplayVersion, UninstallString

$check | Where-Object {($_.DisplayName -in $apps)} | Format-Table

Set-ExecutionPolicy $execpolicy
Installing new Microsoft Teams in VMware Horizon VDI — 4th Jan 2024

Installing new Microsoft Teams in VMware Horizon VDI

The following script installs the new teams in the vdi golden image. If an old version is installed it removes it first. Afterwards a registry key is set to disable automatic updates.

The correct files can be downloaded here.

# get the current execution policy
$execpolicy = Get-ExecutionPolicy

Set-ExecutionPolicy Unrestricted

# location to the teams bootstrapper file
$bootstrapperpath = $PSScriptRoot + '\teamsbootstrapper.exe'

# allow execution of the teams bootstrapper file
Unblock-File -Path $bootstrapperpath

# check if teams is currently installed
$teamsversion = Get-AppxPackage -Name *MSTEAMS*

if ($teamsversion) {
    # if installed remove teams
    Write-Host 'Uninstalling Microsoft Teams version ' $teamsversion.version -ForegroundColor Red

    Start-Process -FilePath $bootstrapperpath -ArgumentList '-x' -Wait
    $teamsversion = ""
}

# location to the teams msix file
$msixpath = $PSScriptRoot + '\MSTeams-x64.msix'

# configure installation parameters
$args = '-p -o "' + $msixpath + '"'

# install teams
Start-Process -FilePath $bootstrapperpath -ArgumentList $args -Wait

# registry path
$registrypath = 'HKLM:\SOFTWARE\Microsoft\Teams'

# disable teams autoupdate 
if (!(Test-Path $registryPath)) {
    New-Item -Path $registrypath -Force | Out-Null
    New-ItemProperty $registrypath -Name 'disableAutoUpdate' -Value 1 -PropertyType DWord -Force | Out-Null
} else {
    if (!(Get-ItemProperty $registrypath -Name 'disableAutoUpdate')) {
        New-ItemProperty $registrypath -Name 'disableAutoUpdate' -Value 1 -PropertyType DWord -Force | Out-Null
    } else {
        Set-ItemProperty $registrypath -Name 'disableAutoUpdate' -Value 1 -PropertyType DWord -Force | Out-Null
    }
}

# check if teams installed correctly
$teamsversion = Get-AppxPackage -Name *MSTEAMS*

if ($teamsversion) {
    Write-Host 'Installed Microsoft Teams version ' $teamsversion.version -ForegroundColor Green
}

# set execution policy back to original value
Set-ExecutionPolicy $execpolicy
Setting up Carbon Black sensor gateway appliance — 29th Nov 2023

Setting up Carbon Black sensor gateway appliance

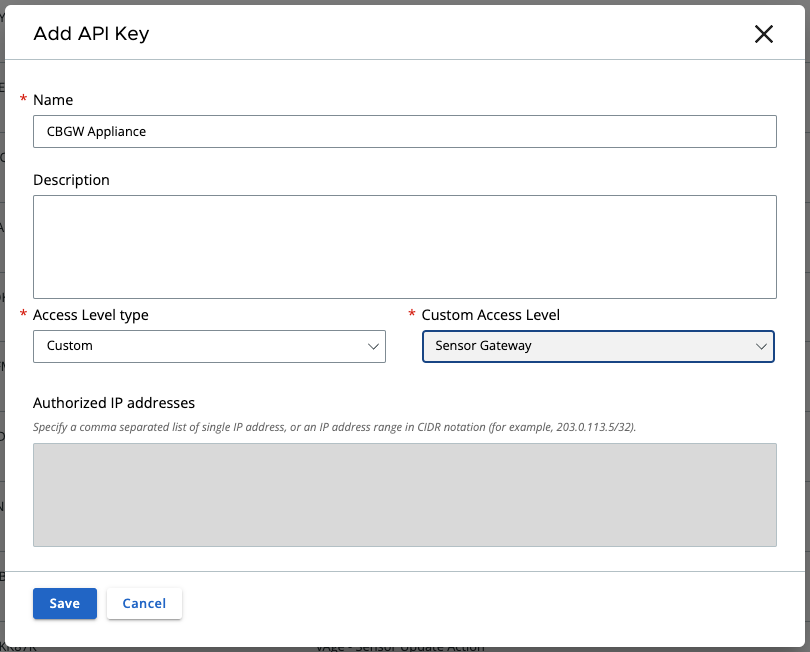
First thing is to do a little preparation. In Carbon Black Cloud console you’ll need to set up an API key so the appliance can communicate with the cloud console.

Go to Settings > API Access and select “Add API Key”. Set the access level to custom and select Sensor Gateway from the custom access level drop down list:

Save the information as we’ll need it later.

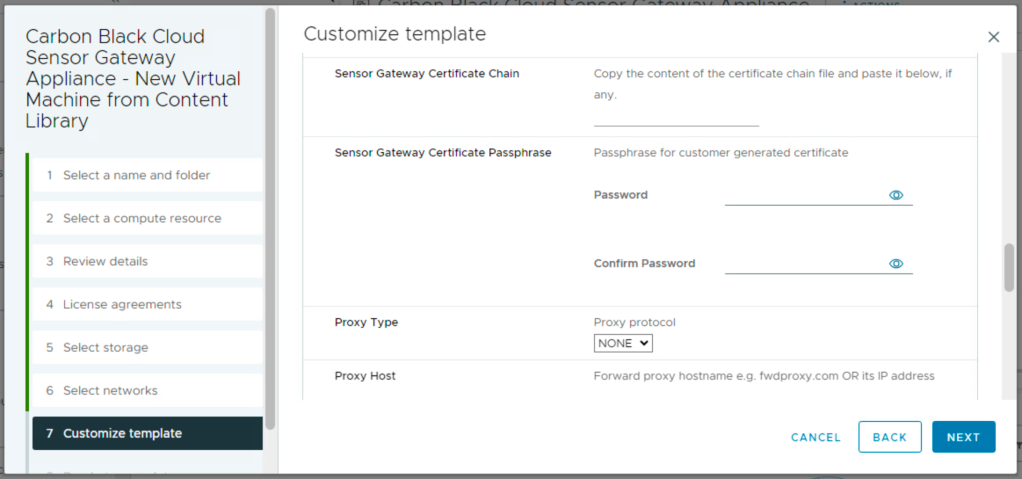
Next is to generate a certificate that will be used on the appliance. You can skip this part if you use self-signed certificates instead but if you go with certificates you’ll the certificate in pem format with private key file and also the full chain, so including the appliance certificate.

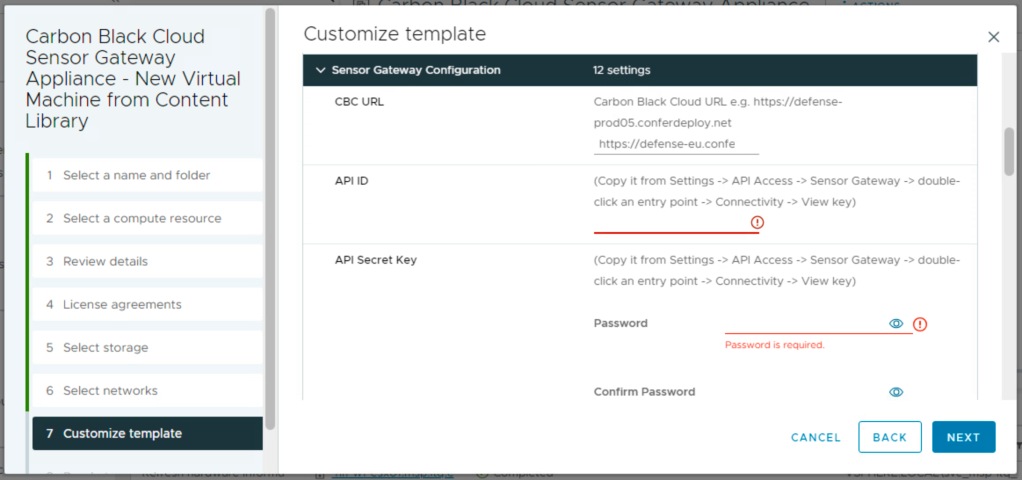
Now we can deploy and configure the virtual appliance. For the CBC URL you can find the necessary information here: https://developer.carbonblack.com/reference/carbon-black-cloud/authentication/#hostname. The API ID and secret you saved before.

The entry point is the FQDN (preceded by https://) of the appliance (this information must match the certificate common name or san). The certificate line accepts more then just one line of data. You can put in the data from the pem certificate file. Same for the private.

Remember in the certificate chain put the full chain, so the certificate again and then intermediate (if used) and the root certificate. Passphrase is used if the certificate is encrypted with a password.

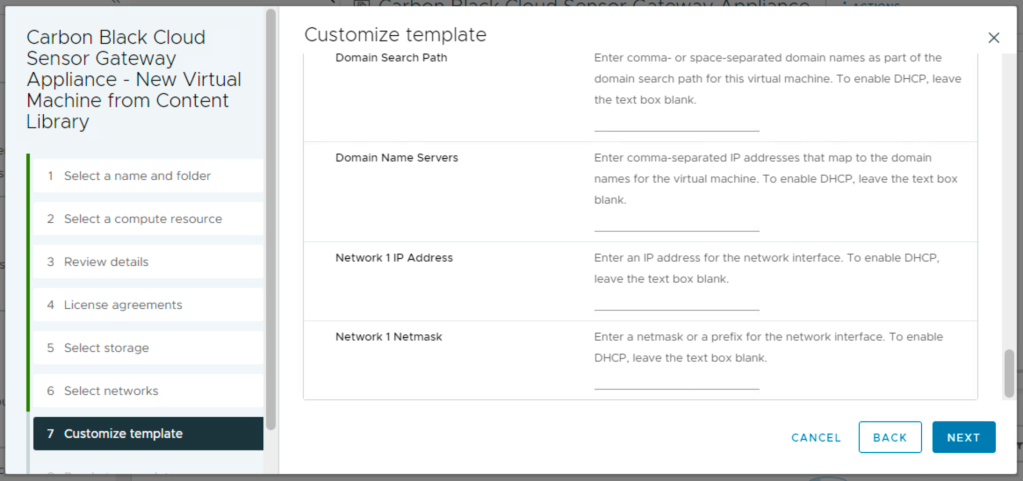
Last thing before deployment is the network information part.

After you boot the appliance you will see that it registers itself in the Carbon Black Cloud console under Settings > API Access > Sensor Gateways.

Now for the installation part of the sensors. You’ll see that you now have an option to generate a registration key through a Sensor Gateway. All devices installed with this new key will connect threw the Sensor Gateway Appliance instead of registering directly to Carbon Black Cloud console.

Documenting, love it or hate it … (Part 3) — 9th Nov 2022
Documenting, love it or hate it … (Part 2) — 8th Nov 2022

Documenting, love it or hate it … (Part 2)

Part 2: Connection to the Horizon API

To access the Horizon API we need a credential that has read access. Let’s begin …

What I usually do in this scenario is creating an account and saving the password as a secure string in the same location as the script. This method is more secure then passing it along in clear text.

'<password>' | ConvertTo-SecureString -AsPlainText -Force | ConvertFrom-SecureString | Out-File ./secure-password.txt

You only need to do this again when your password has changed. Next we will create a credential object that we can use to connect to the Horizon API.

$svc_account_username = '<username>@<domain>'
$svc_account_password = get-content .\secure-password.txt | ConvertTo-SecureString

$Credential = New-Object System.Management.Automation.PSCredential -ArgumentList ($svc_account_username, $svc_account_password)

The next part is actually connecting to the Horizon API using the credential and storing the output in a variable:

$services = Open-HVConnection -HVServer <connection server fully qualified domain name> -Credential $Credential

Last piece of the puzzle is to close the connection and we are done for part 2.

Close-HVConnection -HVServer <connection server fully qualified domain name>

In Part 3 we will have a look at what we received.