First thing is to download the OVA. Head over to VMware customer connect and download the Carbon Black Cloud Workload Protection Appliance OVA.
While downloading, in Carbon Black Cloud console under Settings > API Access > Access Levels create a custom API access level with the following permissions:
| Category | Permission Name | Notation Name | CREATE | READ | UPDATE | DELETE | EXECUTE |
|---|---|---|---|---|---|---|---|
| Appliances | Send workload assets to CBC | inventory.collector.vcenter | Yes | ||||
| Appliances | Appliances Registration | appliances.registration | Yes | Yes | Yes | Yes | |
| Device | Sensor kits | org.kits | Yes | ||||
| Device | Quarantine | device.quarantine | Yes | ||||
| Device | General information | device | Yes | ||||
| Live Query | Manage queries | livequery.manage | Yes | Yes | Yes | Yes | |
| Vulnerability | Vulnerability Assessment Data | vulnerabilityAssessment.data | Yes | Yes | |||
| Workload Management | View Workloads without sensors | workloads.vcenter.vm | Yes | ||||
| Workload Management | Install sensor on vCenter workload | workloads.vcenter.vm_sensor_install | Yes |
Next thing in Carbon Black Cloud console under Settings > API Access > API Keys is to create an API key using the above access level. Save the information together with the ORG KEY that you find on the same page.
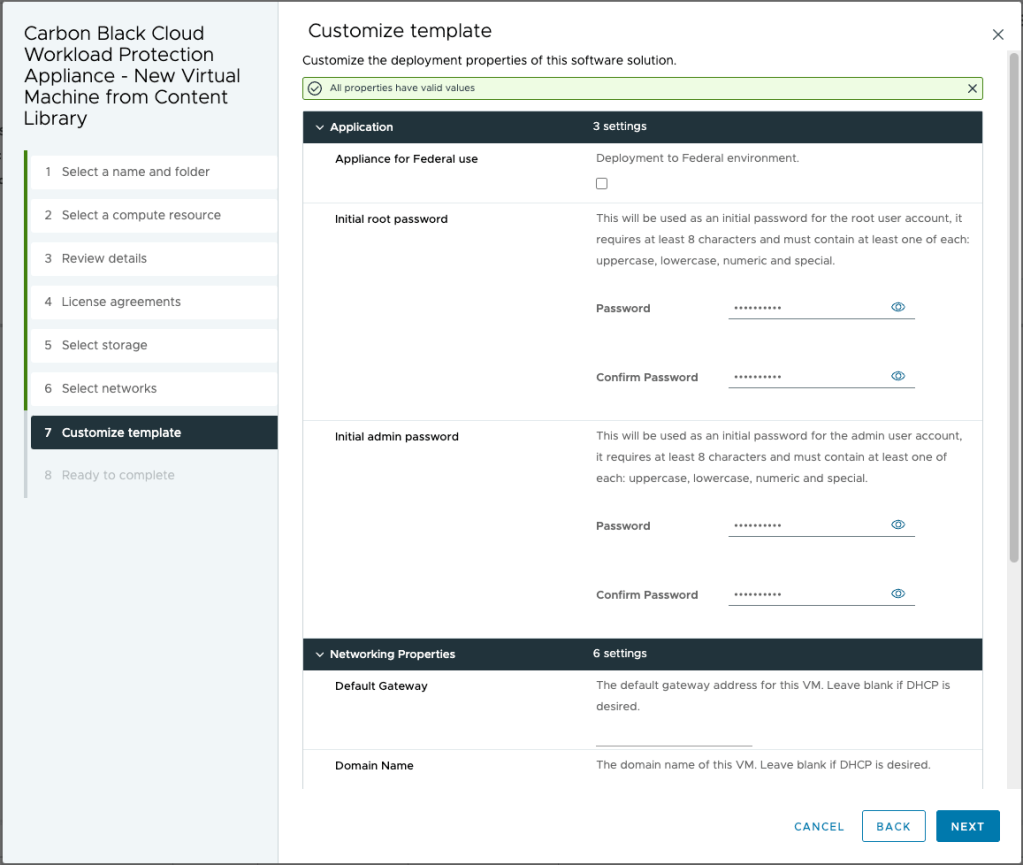
Hopefully by now the download has finished. Head over vcenter and deploy the OVA and supply passwords for both root and admin account. Depending on your network infrastructure fill in the network information or leave blank for DHCP.
After deployment power on the appliance, fill in credentials and log in to the appliance.

The appliance is online but it still lacks communication with VMware vCenter and Carbon Black Cloud. Head to Appliance > Registration and provide the information for vcenter and the API information for connection to Carbon Black Cloud console.

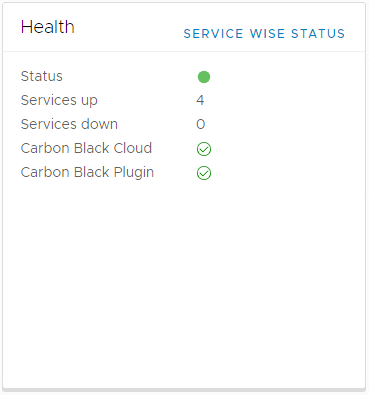
If you done everything correctly it should all be green in the dashboard.
However, if like me, you messed up the ip configuration go to the vm console, change the ip information using the bellow command and reboot the appliance.
/opt/vmware/share/vami/vami_set_network eth0 STATICV4 <ip> <mask> <gateway>

